Need to start bulk buying to better save money over time? Here’s how.
Back in 2018, I started trying to move beyond just my regularly weekly and monthly grocery needs. I realized that having a little bit of a back-stock on hand was helpful; it meant that if I was sick or if an extenuating circumstance came up that was outside of my control and typical schedule, I would be covered with extra food on hand. At the time, we lived in 900 square feet.
Now we live on a farm and our family has grown. We have 6 children in fact and an abundance of farm animals that also need feed.
Building what I call a buffer is one of the first things I did to build our cold storage inventory. And it is still the most important concept I have for maintains our cold storage inventory regardless of the size or amount of food.

Before you get started on an emergency food supply, here’s what to consider:
I have included affiliate links to companies and items I have personally used and recommend. We earn from qualifying purchases.
Especially because we are a large family, having something everyone wants and likes to eat is important. We also prioritize nutrient dense ingredients as we make meals. But on average, focusing on bulk ingredients, canning, and dehydration is a great way to ensure both cost-effectiveness and nutritional value.
- What is your budget for this project? Knowing this will help determine the quantities and types of food you can acquire.
- What storage space do you have available? Bulk ingredients require significant storage. Do you have a pantry, basement, or other suitable area? There are plenty of creative ways to store food if you have limited space, but identifying what you have is necessary before getting started. Here are unique ideas to maximize the space you have to store dry goods.
- What are your family’s dietary needs and preferences? Are there any allergies, intolerances, or strong dislikes? This is crucial for ensuring everyone will eat the stored food.
- What equipment do you already own for canning, dehydrating, or other food preservation methods? This will influence the types of foods you can store and the processes you’ll use.
- What is your current level of experience with food preservation techniques like canning, dehydrating, or freezing? This will help identify areas of growth and planning as you acquire new skills and equipment to store food.
- Start saving regardless of your budget. Here’s a method and free download to get started saving $1,000 towards your family food supply:
Let’s break down a sample method of scaling your efforts for starting a shelf stable food supply:
Phase 1: Planning and Prioritization (All Skill Levels)
- Calculate Caloric Needs: A general guideline is 2,000 calories per person per day. While we have 8 people in our family, a few are little. SO let’s just say 6. For 6 people for 90 days (3 months), that’s 1,080,000 calories (2,000 x 6 x 90). This is a very rough estimate. Consider activity levels and adjust accordingly. Don’t get too hung up on this number, it’s just a starting point.
- Inventory Current Supplies: Before buying anything, check what you already have. This prevents duplication and helps you focus on what’s needed.
- Prioritize Staples: Focus on shelf-stable, calorie-dense foods. Grains, legumes, and fats are the foundation.
Phase 2: Food Acquisition and Preservation
Beginners - Focus on Grains and Legumes: These are inexpensive and versatile. Buy in bulk from warehouse stores or online. We prefer to buy from Azure Standard because it’s the highest quality food at the lowest cost we have been able to find. Examples: Rice (white and brown), dried beans (kidney, pinto, black), pasta, oats, quinoa.
- Simple Dehydrating: Start with fruits and vegetables that are easy to dehydrate. Examples: Apples, bananas, carrots, onions. These can be added to meals for nutrition and flavor.
- Limited Canning: Begin with simple, high-acid foods that are safe for water bath canning. Examples: Fruits (peaches, applesauce), tomatoes (plain, crushed).
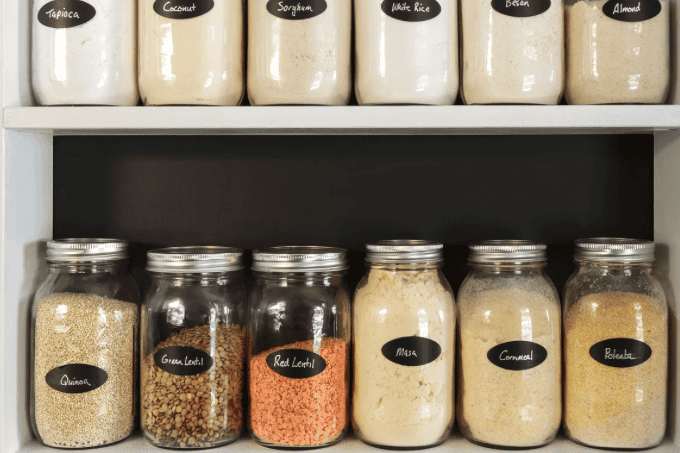
- Storage: Use your pantry cabinet initially. Store grains and legumes in airtight containers (buckets with lids, jars) to prevent pests.
Intermediate: - Expand Grain and Legume Variety: Add more options for nutritional diversity. Examples: Wheat berries, barley, lentils, split peas, couscous.
- Increased Dehydrating: Experiment with more vegetables, herbs, and even some meats (jerky). Examples: Bell peppers, mushrooms, spinach, garlic powder, onion powder.
- Pressure Canning: Learn to safely pressure can low-acid foods like vegetables, meats, and soups. This significantly expands your storage options. Examples: Green beans, corn, chicken, beef stew.
- Budgeting: Start tracking your food purchases to stay within your $50-$100 monthly budget. Look for sales and buy in bulk when prices are low.
- Storage: Expand to a closet or other storage area. Use shelving to maximize space.
Advanced: - Diversify Food Sources: Consider sprouting seeds for fresh greens, and possibly even gardening for some fresh produce.
- Advanced Dehydrating: Make fruit leathers, vegetable powders, and complete dehydrated meals.
- Master Canning: Explore different canning techniques and recipes. Consider canning soups and whole meals for convenience.
- Long-Term Storage: Focus on rotating your stock to ensure freshness. A first-in, first-out system is crucial.
- Budgeting: Explore bulk buying via Azure Standard or directly from farms for even better prices.
- Storage: Optimize your basement storage. Consider using a food storage calculator to estimate how much space you’ll need.
Scaling Over Time: - Budget: As you become more proficient, you can gradually increase your budget if possible. Even small increases can make a big difference over time.
- Storage: As your food supply grows, you’ll need more storage space. Plan for this in advance.
- Skills: Continuously learn and improve your food preservation skills. The more you know, the more options you’ll have.
Important Considerations: - Water: A 3-month supply of water is equally crucial. Plan for at least one gallon of water per person per day. This is for drinking, cooking, and more.
- Tools and Equipment: You have a good starting set. As you progress, you may want to invest in additional tools like a grain mill.
- Security: Store your food in a secure location where it won’t be damaged by pests or the elements.
- Rotation: Regularly rotate your stock to prevent spoilage. Use the oldest items first.
We have even used a big black permanent marker on many of our items to indicate when the expected expiration date is. This is because when buying “finished” goods such as a can of soup or peanut butter, buying from different locations might mean that one expires before one you already have on your shelf.
How to start allocating money towards a food and medical supply buffer
- Start by treating your food supply as a type of emergency fund. The mindset shift will allocate money to just how important it is to have food on hand. Start on putting away a few dollars here and there to be able to do 4 months at approximately $100 per month to start. (The link above is my guide on where to start)
- Evaluate what your family will actually eat. There is absolutely no point in stocking up on food that either you cannot eat or simply won’t eat. So while some people might be able to have all the beans in the world, maybe your family cannot eat legumes, and that’s fine.
- Acclimate yourself to using new items. For instance, using a blender to make powdered sugar or some molasses to make brown sugar is a quick and easy way to reduce your money spent on staples, but takes some time and practice to get used to. Similarly, fresh milled flour is not only more nutritious, but it also saves money over time to buy bulk grains to mill versus flour. You can start by using a blender to “mill” your grains and mix it with pre-milled flour in a 50/50 mix to get used to it before taking a complete dive into milling all of your grains.
- Start by putting back just $5 any time you can, even $10. Once you get to over $400, do either one big bulk buy or split it into a few months like the post above details. Then start saving $25 at a time. This is easier to do as you are buying more in bulk because you can set aside the difference of what it would have cost you. Then $50 at a time. I have found that once people have $1,000 invested into their cold storage food emergency fund, they typically can start buying the bigger or biggest bags of bulk ingredients to continue to cut down on their long-term cost of food.
- Start thinking about food in terms of “quarterly” and “yearly” purchases. This will help you stock up when something goes on sale and have enough for an extended period of time.
Why having a buffer of bulk ingredients helps save money
There are some obvious answers to this question. Buying in bulk means you pay a smaller cost because the supplier is offering it without a bunch of smaller packaging and they’re selling more so you get it cheaper in the long run.
However it’s more than that.
Buying in bulk and having a buffer of food is helping you to ride out the ups and downs in pricing. You can buy large quantities of food when it is on sale and know that you have enough to get to the next sale.
It means that you’re buying in season (again this is where thinking of buying in quarters and years is important. A year of apples turned into applesauce for the shelves look different than a bag of apples weekly. But we have purchased in-season apples for a fraction of the price and even gleaned free apples and stored them on our shelves, rotating through them weekly for a year).
How to manage and rotate your family’s cold storage food supply
The number one rule we have about buying new food and rotating what you have is to buy a new one before or when the last one gets opened (not when it’s empty).
This is exactly what creating a buffer means.
If you consume everything before you buy new there is no buffer to get you to your next bulk buy.
After your first month or storing food:
- Review your stored food.
- Identify any gaps in your supply (e.g., more of a specific grain, need more canned goods).
- Adjust future purchases accordingly.
Ongoing Monthly Checklist (Repeat and Adjust):
- Evaluate remaining budget.
- Review stored food inventory.
- Plan meals for the next month.
- Purchase grains, legumes, and other to replenish stock.
- Purchase fruits and vegetables for dehydrating.
- Purchase items for canning or storing on shelves (if needed).
- Dehydrate fruits and vegetables.(especially rotating out frozen foods for this to make the shelf stable).
- Can fruits, vegetables, broths, and other foods.
- Rotate stored food (first in, first out).


